Why isn't there more hours in the day???? I need about FIVE more hours a day!
As I am buzzing around the studio doing paper piecing, then switching to applique, then something else - I am HAPPY (no ECSTATIC!!!!!!!!!!!!!!!!!!!!) that whatever supply I am looking for - I can find it. This morning - I needed a scrap of interfacing - went to the cabinet with the interfacings - pulled the drawer open and there was a scrap. No time spent digging through a box of crap in order to find what I wanted. Also I needed a gift bag and some tissue and that was a snap to find in the newly organized storage room. And the beauty of having everything organized you don't live in danger of knocking something over, or breaking your neck as you trip over something. Trust me - I had to HOP over things before. Now I just waltz in - get what I want and waltz back out. It is SUCH A COOL FEELING to walk along the shelves and get what I want.
It was a LONG haul and anyone facing that organization task is probably dreading it (as I did), but now that it is done - it is a SNAP to clear up the room (which I have to do this week as company is coming on the weekend!!) and I can find everything!!!!!!
The only thing left are those books and they need to be done, because I am back to searching through the entire book shelf in order to find books and that is a waste of time. Soon..................... If I could stop sewing.
I am POSSESSED. I really can't help myself. I could sew 24 hours a day if I could. I can't seem to stop.
But let's get back to Dear Jane. Yesterday I returned the Dear Jane quilt that I borrowed. But not before I took some pictures.
 |
| Dear Jane in all it's GLORY |
This quilt was done as a kit from Jillybean's Pride (which closed a number of years ago). The owner started the quilt in January 1998 and finished in 2001!!!!! But she couldn't remember if that included the quilting or just the top. I bet it was the entire quilt. I asked about the batting - she used Dream Cotton - Request which is the lightest weight.
Now most of us would think that the fabrics all came from the same era - civil war or reproduction or something, but have a CLOSE look at what types of fabrics did get put in the quilt..................
 |
| A BRIGHT novelty???? (can you spot it in the above picture????) |
 |
| Millennium fabric!!!! |
 |
| Orange and black Halloween |
 |
| Checks, William Morris, strips |
 |
| Checks and 30's |
 |
| Orange bright (got to find a spot to put orange in mine!!!) |
 |
| More millennium fabric |
 |
| A bright orange - this one you can pick out in the main picture!!!! |
I decided that if I was going to start working on mine, that I had better get the fabrics chosen, the design figured out and placement of fabrics and colours, and all that fun stuff.
I started by taking a photocopy of the quilt block diagram on Page 12. I got out my handy Sharpie marker pack and started by colouring the squares.
 |
| My Sharpie coloured diagram |
Then when I went to lay out the fabrics - I didn't have enough in the colours I wanted so I abandoned this diagram!!!!!
Remember I was playing with the basket of fabrics that I borrowed from Marian.
 |
| See - here is the jumbled basket after I rifled through it |
Then I got busy and laid out the fabrics to see what they would look like.
 |
| This is what the basket of fabric looks like now. Notice how neatly it is all folded!!!!!! But there is a bit missing and where is it??????? |
 |
| Here it is!!!!! I started with the green in the center like the original. The next row is yellow like the original. And then I did whatever I wanted. |
 |
| THE original - photo from the book. |
I am still missing fabric in the corners and hope to throw in some orange in the corners. It will be from MY stash as by this point, I had taken all I needed from Marian.
So now - it is time to sew. I started with block A6 - Uncle Homer.
 |
| Block cut out and ready to piece |
 |
| Completed block (front) |
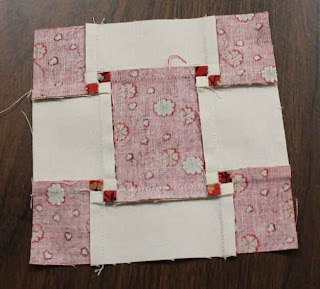 |
| Completed block (back) |
 |
| LOOK - the block is the right size!!!!! |
 |
| And the block (see it way at the top) in the scheme of the quilt |
The rest of the fabric - well it went back into Marian's box. I doubt she is even going to notice that I took some scraps from it to make this quilt. You really do NOT need a lot for each block. After all - they are FIVE inches unfinished and there is background in each.
Now these fabrics are laid out on the floor and anyone with pets knows that that is a SERIOUS problem. I gave the girls a lecture this morning about walking, or sleeping on this fabric.
However - look.............................
 |
| Hey Mom - look at me!!!! I am NOT walking on it or sleeping on it. I am RIGHT BESIDE it. |
 |
| Ah - if I just stretch out a bit, she won't notice. |
AGH!!!!!!!! OK - so that means today (they won't come down to the studio during the day as M and DH are both home) when I get back from Monday Motivators, I MUST label each fabric with its appropriate block number and put them away!!!!! I was going to do that anyway - I can't leave the fabric laying on the floor, but it sure looks cool to make a block and then insert it in the mix.
I started on the next block which involves applique. Although I told the group to make the applique shape smaller, I completely forgot to do that myself and when I was finished prepping the block - the applique shapes were TOO big. Drat - so I reduced the shape to 96% on my handy dandy all-in-one printer. Every quilter NEEDS to have a photocopier (all-in-one) at their disposal - it is essential for resizing applique.
I have a lengthy tutorial on the STARCH method of applique which I will post tomorrow.
The more I looked at the blocks of the quilt, the more I realize that this is a VERY DOABLE project. The key is to MAKE time to get the homework done. That organizing thing saves me enormous amounts of time - what else can I eliminate in the day?????? Oh I would so love to have someone to do the cooking and all the cleaning - not that I do much in that department anyway!!!!!
And yesterday to make efficient use of my time in the car when I was dropping off that quilt - I called Marian who gave me a tutorial (although I was just asking questions) about needle turn applique. I was hoping to get started on my little test block when I got home, but after a couple of errands and then preparing all the homework e-mails for the various groups from Saturday - that pretty much ate up my entire afternoon.
Have a GREAT DAY!!!!!!!!
Ciao!!!!!!!


