Well it would appear that you have to ride at least 100K!!!!! But do you ever wonder how you can rack up the KM on your car just running around doing errands. Then when you want some serious distance - well where do you rid?????? Check out the link below - you can see all the gory details of my ride today!!!! Yes - only an idiot would ride that distance on one of the hottest days of the year! But I DID wear sun screen. I am sure that I still looked like a tomatoe with a helmet! I felt great the entire ride and did some decent times on the hills, but I ran out of food and there are NO corner stores in some of these areas. And I was dehydrated when I got home, but once I pumped some electrolytes into me - I was OK. However I have to say that I was feeling so great, that I got this crazy notion in my head that I would be able to CONQUER that nasty hill on 6th line. And you know what - I DID!!!!!!! Slow and steady and I felt great at the top.
Crazy ride on a hot day!!!!!
As for the rest of the day - well I did NOT get much done!!!! And now I have to figure out what to do with my evening. Anyway - have a look at all those numbers - OK - you don't have to, but they are kind of interesting. but look at the map - it's pretty cool and the final distance?????? 115K. As long as I have food with me - I think I will be good to go for the big upcoming rides. Let the day be slightly cooler than today, although there wasn't much wind!!!
Have a great day!!!!
Ciao!!!!!
Tuesday, May 31, 2011
Monday, May 30, 2011
Christmas Heart Light
What a whirlwind weekend. Going to have to do this in bits cause time is limited AGAIN!!!!
Started off with the $10 quilt classes at Hobby Horse on Saturday morning.
Here is the show n tell from Christmas Heart Light......
The homework was SIX star blocks. It was called VARIABLE star and oh boy - just when you think you can do NOTHING to change up a simple block - the ladies had their creative hats on yet again. The work was outstanding!!!!! Some only showed one block if they were all the same, so don't think anyone was slogging off their homework!!!
Here is the original pattern just in case you have forgotten what it looks like.

They are all going to be beautiful quilts and hopefully they will all be ready for Christmas!!!!
Here are the HOMEWORK blocks for this coming month. I needed NINE of these to get my 24 blocks for the center of the tree. Make as many as you need depending on how many of the others you made.
I'll catch up the rest of the weekend later. Off to Altitude Simulation Training again! That sure eats into blogging time!!!!
Have a great day!!!!
Ciao!!!!
Started off with the $10 quilt classes at Hobby Horse on Saturday morning.
Here is the show n tell from Christmas Heart Light......
The homework was SIX star blocks. It was called VARIABLE star and oh boy - just when you think you can do NOTHING to change up a simple block - the ladies had their creative hats on yet again. The work was outstanding!!!!! Some only showed one block if they were all the same, so don't think anyone was slogging off their homework!!!
 |
| Janet (the brown one is for the tree trunk and she started a TREND) |
 |
| Marilyn |
 |
| Anne - with her fussy cut centers!!! |
 |
| Helen Anne |
 |
| Joyce |
 |
| Teresa and Mary |
 |
| Linda |
 |
| Jo |
 |
| Lesley |
 |
| Gayle |
 |
| Anne - who got a TAD ambitious and got most of the top together. |
 |
| Judy (homework from last month) |
They are all going to be beautiful quilts and hopefully they will all be ready for Christmas!!!!
Here are the HOMEWORK blocks for this coming month. I needed NINE of these to get my 24 blocks for the center of the tree. Make as many as you need depending on how many of the others you made.
 |
| Mix and match blocks |
I'll catch up the rest of the weekend later. Off to Altitude Simulation Training again! That sure eats into blogging time!!!!
Have a great day!!!!
Ciao!!!!
Friday, May 27, 2011
Just a bunch of stuff!!!
Got some odd pictures that have been kicking around and I have a few minutes so here goes ....
This is for Lynn M. I caught this fellow when I was down by the Humber River the day I volunteered for the marathon.

The next picture is for Marian. I captured this one downtown Toronto. Yes - Toronto now has the BIXI bike. These are right down town - many many stations. I figured she could teach Kaylee to sit in the basket and she could go for a ride from time to time when she is down town!!!!

Got another customer quilt done. Yeah!!!

And this is lunch from yesterday. OK - so Margo was eating!!! It was very YUMMY!!! - Quizno Sub. My first time and I enjoyed it.

One thing I learned (but I never do it until I have no choice) is that I should reboot my computer from time to time. I keep opening windows to the internet and will have MANY open at the same time. The photo editor is open and often contains MANY pictures. All of that takes up memory BIG TIME and then the system just doesn't want to work properly. Then I have to close everything. So I MUST make an effort that ONCE A WEEK - I close it down - reboot and I should have no problem in the future. Hmmmmmmm - better plan that in a schedule cause I will never remember.
Got a busy day planned tomorrow.
Have a great day!!!
Ciao!!!!!
This is for Lynn M. I caught this fellow when I was down by the Humber River the day I volunteered for the marathon.


Got another customer quilt done. Yeah!!!

And this is lunch from yesterday. OK - so Margo was eating!!! It was very YUMMY!!! - Quizno Sub. My first time and I enjoyed it.

One thing I learned (but I never do it until I have no choice) is that I should reboot my computer from time to time. I keep opening windows to the internet and will have MANY open at the same time. The photo editor is open and often contains MANY pictures. All of that takes up memory BIG TIME and then the system just doesn't want to work properly. Then I have to close everything. So I MUST make an effort that ONCE A WEEK - I close it down - reboot and I should have no problem in the future. Hmmmmmmm - better plan that in a schedule cause I will never remember.
Got a busy day planned tomorrow.
Have a great day!!!
Ciao!!!!!
Elm Creek Quilts - May reveal
Time to play catch up. We had the May show n tell last week and I HAVE to get the results posted. Now to remember which blocks belong to whom. Gosh - is that the correct grammar???? all those "whichs" and "whos" and "whoms". I really need to get a grammar refresher, But I digress.......
And there we have the show n tell for May. I have to say that I am VERY IMPRESSED with the blocks so far. There are 140 blocks in total and NOT everyone is going to make all 140. There is no penalty for not completing any of the blocks and life gets in the way so some months may need to be caught up later and some blocks - well - I wonder whether I would make them if I wasn't making them for the class. However there is the challenge of making all 140. Whether they all go in the quilt or not is another thing!!!!
And now the homework for the next group of 10. Hopefully you are all getting the hang of it by now, but here goes with a few tips to keep you on track.
Remember there are MANY ways to assemble these blocks. The book has one way - sometimes I agree with the pattern and believe that is the easiest way, however if you have a different way - then I say DO IT YOUR WAY!!!! There is no WRONG way to assemble anything and there are NO quilt police!!!
Above all - remember these are learning experiences and some blocks may not as successful as you would like - well we will have our work session to help you with those. I will send you an e-mail with those dates.
Album Block 1 - Page 14 - This block is paper pieced. If you are comfortable with paper piecing, then use the pattern in the book. If not - your hand out includes instructions to rotary cut the block. Note - the sizes are slightly smaller than the paper pieced pattern - why cut 16s when we can cut 8s??? Because of that rounding down in sizes, the center is a smidgen smaller than it is supposed to be. Hence I made the background a bit bigger to compensate. Simply trim the background away and VOILA - your block is 6 1/2".
Clay's Choice - Page 26

Autumn Leaf - Page 17 - First round of applique. There are MANY ways to applique. My favourite is to use starch to turn the edges under. But fusible applique would work perfect here as well. Note the templates in the back of the book ( E is the wrong length). We are NOT using templates in this block except for the point - Templates C and G - which I cut from freezer paper.
Boy's Nonsense - Page 21 Again - this block is paper pieced and I provided the instructions to rotary cut it. This means that I rounded DOWN the sizes slightly to avoid the 16s measurements. The center design is slightly smaller and I made the background bigger so it can be trimmed down.
Courthouse Steps - Page 28 - Again - this pattern is paper pieced. I gave you the rotary cutting directions.
|Chicago Pavements - Page 24 - Another paper pieced block. Again - we are going to reduce the center ever so slightly so we can rotary cut in decent measurements. Make the background slightly larger and trim to 6 1/2"
Cut Glass Dish - Page 29 -
 |
| Judy |
 |
| Pat |
 |
| Carol |
 |
| Ginette |
 |
| Celia |
 |
| Janice |
 |
| Vicki |
 |
| Susan |
 |
| Tish |
 |
| Lois |
 |
| Joanne |
 |
| Marianne |
And there we have the show n tell for May. I have to say that I am VERY IMPRESSED with the blocks so far. There are 140 blocks in total and NOT everyone is going to make all 140. There is no penalty for not completing any of the blocks and life gets in the way so some months may need to be caught up later and some blocks - well - I wonder whether I would make them if I wasn't making them for the class. However there is the challenge of making all 140. Whether they all go in the quilt or not is another thing!!!!
And now the homework for the next group of 10. Hopefully you are all getting the hang of it by now, but here goes with a few tips to keep you on track.
Remember there are MANY ways to assemble these blocks. The book has one way - sometimes I agree with the pattern and believe that is the easiest way, however if you have a different way - then I say DO IT YOUR WAY!!!! There is no WRONG way to assemble anything and there are NO quilt police!!!
Above all - remember these are learning experiences and some blocks may not as successful as you would like - well we will have our work session to help you with those. I will send you an e-mail with those dates.
Album Block 1 - Page 14 - This block is paper pieced. If you are comfortable with paper piecing, then use the pattern in the book. If not - your hand out includes instructions to rotary cut the block. Note - the sizes are slightly smaller than the paper pieced pattern - why cut 16s when we can cut 8s??? Because of that rounding down in sizes, the center is a smidgen smaller than it is supposed to be. Hence I made the background a bit bigger to compensate. Simply trim the background away and VOILA - your block is 6 1/2".
 |
| Lay out of some of the Album Block pieces |
 |
| Notice how much bigger those background triangles are from the coloured strips. |
 |
| Trim the excess points away and mark the center of each section and sew together |
 |
| One half of the block. Always find the center and sew the sections (strips) together |
 |
| Center complete WITHOUT the corners - they are the last to sew on. |
 |
| Album Block - yes the corners are bigger than they need to be, but better bigger than too small. Now using your 6 1/2" square ruler - center the coloured strips and trim to 6 1/2" |
Clay's Choice - Page 26

Autumn Leaf - Page 17 - First round of applique. There are MANY ways to applique. My favourite is to use starch to turn the edges under. But fusible applique would work perfect here as well. Note the templates in the back of the book ( E is the wrong length). We are NOT using templates in this block except for the point - Templates C and G - which I cut from freezer paper.
 |
| Autumn Leaf - what the section looks like after the first C is sewn to G |
 |
| Notice the overhang when sewing C to G. This little notch will ensure that the edge is smooth when pressed. See the bottom edge of the block in the photo above. |
 |
| The two Cs sewn to G - again notice how the side edge is nicely lined up because of the little dog ear left when sewing. |
 |
| This section needs to be trimmed to 2 7/8" |
 |
| The machine applique stitch (wrong side). I use a zig zag - width = 1 and length = 1.5 |
 |
| Using a "matching green" (I don't worry if the colour isn't exact) on top and on the bobbin (if a bobbin is wound - otherwise - something dark or neutral) |
 |
| Autumn Leaf block |
Boy's Nonsense - Page 21 Again - this block is paper pieced and I provided the instructions to rotary cut it. This means that I rounded DOWN the sizes slightly to avoid the 16s measurements. The center design is slightly smaller and I made the background bigger so it can be trimmed down.
 |
| The center section |
 |
| Trim to 3 1/4" - you will trim a "fair" amount away. |
 |
| The flying geese may not have points exactly in the corners. I don't think it makes a whole lot of difference. |
 |
| A little trick for these diagonally pieced blocks. Once you get two sides on - you can place your 6 1/2" ruler on the piece and you can see here that I have lots of extra on both diagonal corners. I can proceed with the block knowing that it will be big enough. |
 |
| Adding triangles to the flying geese. Again - see how big the background triangles are - you will need to trim off those points. Find the center of the two sections and then sew together and then sew to the rest of the block. |
 |
| Boy's Nonsense - again - see how large it is (well trust me on that one), but there is LOTS of room to trim and still get the 6 1/2". Don't forget to center the design. If not sure - we will cover that in class. Cats and Mice - Page 23 - Pretty straight forward. If you have difficult with the size - (mine is slightly too large). I am going to remove the orange tips and shave a little bit off of the green squares on each of the four corners. I can then resew the orange tips on. Again - don't be afraid to use that 6 1/2" ruler in the construction process to see where you are with size. Yes - I will rip down the seam between the background and the green BEFORE I take the small shaving off. |
 |
| Cats and Mice BEFORE trimming |
 |
| Courthouse steps - you can see that my pieces are NOT matching. I fixed that issue with the sizes I gave you. I need to trim this to 6 1/2" |
 |
| Chicago Pavements - pieces laid out. The small triangles (from the 3" squares) attached to the squares and rectangles |
 |
| Trim the points off the background and sew together |
 |
| Sew two sides to the center - trim those background points and sew the remaining two corners on. |
 |
| Chicago Pavements - trim to 6 1/2" |
Cut Glass Dish - Page 29 -
 |
| Cut glass dish |
 |
| Cut glass dish - the pressing plan. I sewed the half square triangles in groups of 4 and twisted the seam. |
 |
| CAUTION - this is the way I FIRST sewed this block together - oops - that is NOT right. A little surgery and I got the right orientation on those half square triangles. Double Nine Patch - P 30 - While this block looks complicated it is NOT. It just has a lot of fiddly little pieces. You can cut strips if you wish - I just cut a bunch of small squares the size of the template which is 1 3/16". Here are some tips for working with small pieces - Note - I use these techniques for ALL my sewing.  I use a stiletto (the long pointy thing) which is also called a quilter's awl. This allows me to get my fingers in to arrange fussy little pieces as my fingers are TOO FAT to get that close to the presser foot. 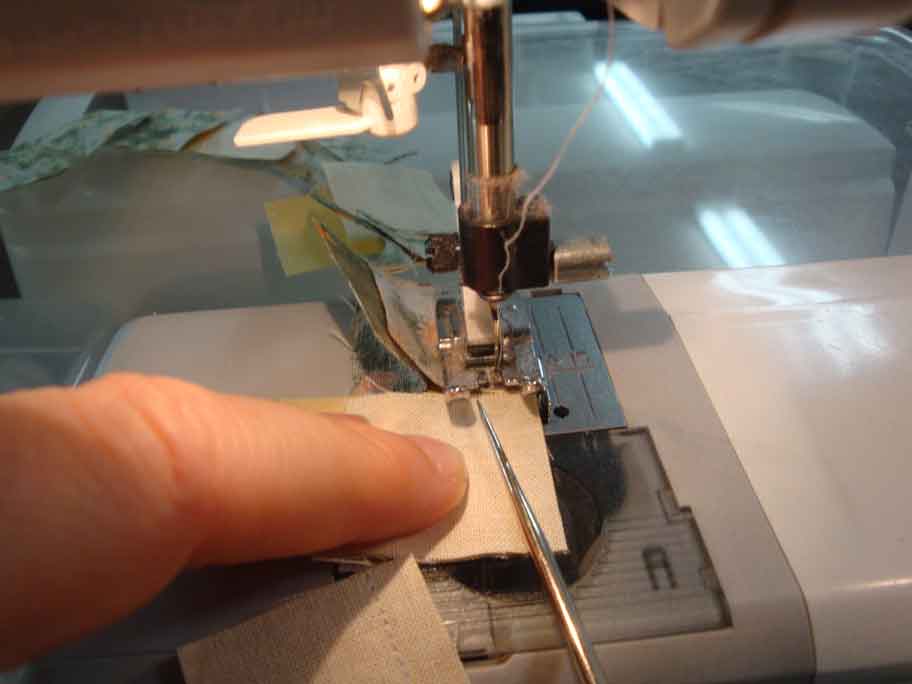 Here I am using the stiletto to hold the pieces in place while they go under the presser foot. Notice how close the stiletto is to the needle. You wouldn't do this with your finger!!!! And you get MUCH MORE CONTROL and therefore accuracy.    Once the small nine-patches were made, I trimmed them to 2 1/2". There wasn't MUCH to trim, but I did so they would fit no problem with the plain squares  Double 9-patch Dutchman's Puzzle - P 32 - this is easy and nothing new.  Dutchman's Puzzle |
And there you have it - all 10 blocks for the homework in May.
Have a great day!!!!
Ciao!!!!!!
Subscribe to:
Posts (Atom)