What a day!!! I had a super productive day yesterday. Not only that, but I'm thrilled with the results. Unfortunately, it's a deadline quilt and I can't share it with you yet. I now need some thread and there's no way I'm going to find my threads in time, so I'm off today or tomorrow to get some thread.
While all this process is happening, I'm thinking about how to rejig that space in Studio B. As if what has happened hasn't been enough, the stash was NOT touched. Nope - there was no fabric in those boxes you saw before and none in the POD. However, the floor guys said - we need that room half empty and the shelving removed before they can proceed with the repair. ACK!!!!! And they want it gone TODAY!!! Let's not panic!
A call was put into the restoration company and they are supposed to have a crew out this morning. I did move some stuff last night. Holy cow - that's a lot of stuff I have. I'll be posting those videos I took of the stash room back in February. I hope to get them on my YouTube channel today so you can see what we're up against. It's not going to be pretty!!!
But, let's put that unpleasant thought aside and focus on something fun! I have several of these ongoing quilts on the go this year and I'm determined to NOT get behind in any of them. So far, so good. On my "free" sewing day on Sunday, I dug this out. This is the Lilla quilt and I had 24 blocks partially completed that I had used in my class on Friday night.
 |
| Partially prepped blocks for Lilla |
 |
| The summer homework for Lilla is DONE |
God, I'm scaring myself!! OK - these next few pictures are strictly for the class. There was one block - they know which one it was. I knew they were going to ask - it's Block THIRTEEN. Makes sense. The instructions are a nightmare. So here goes.
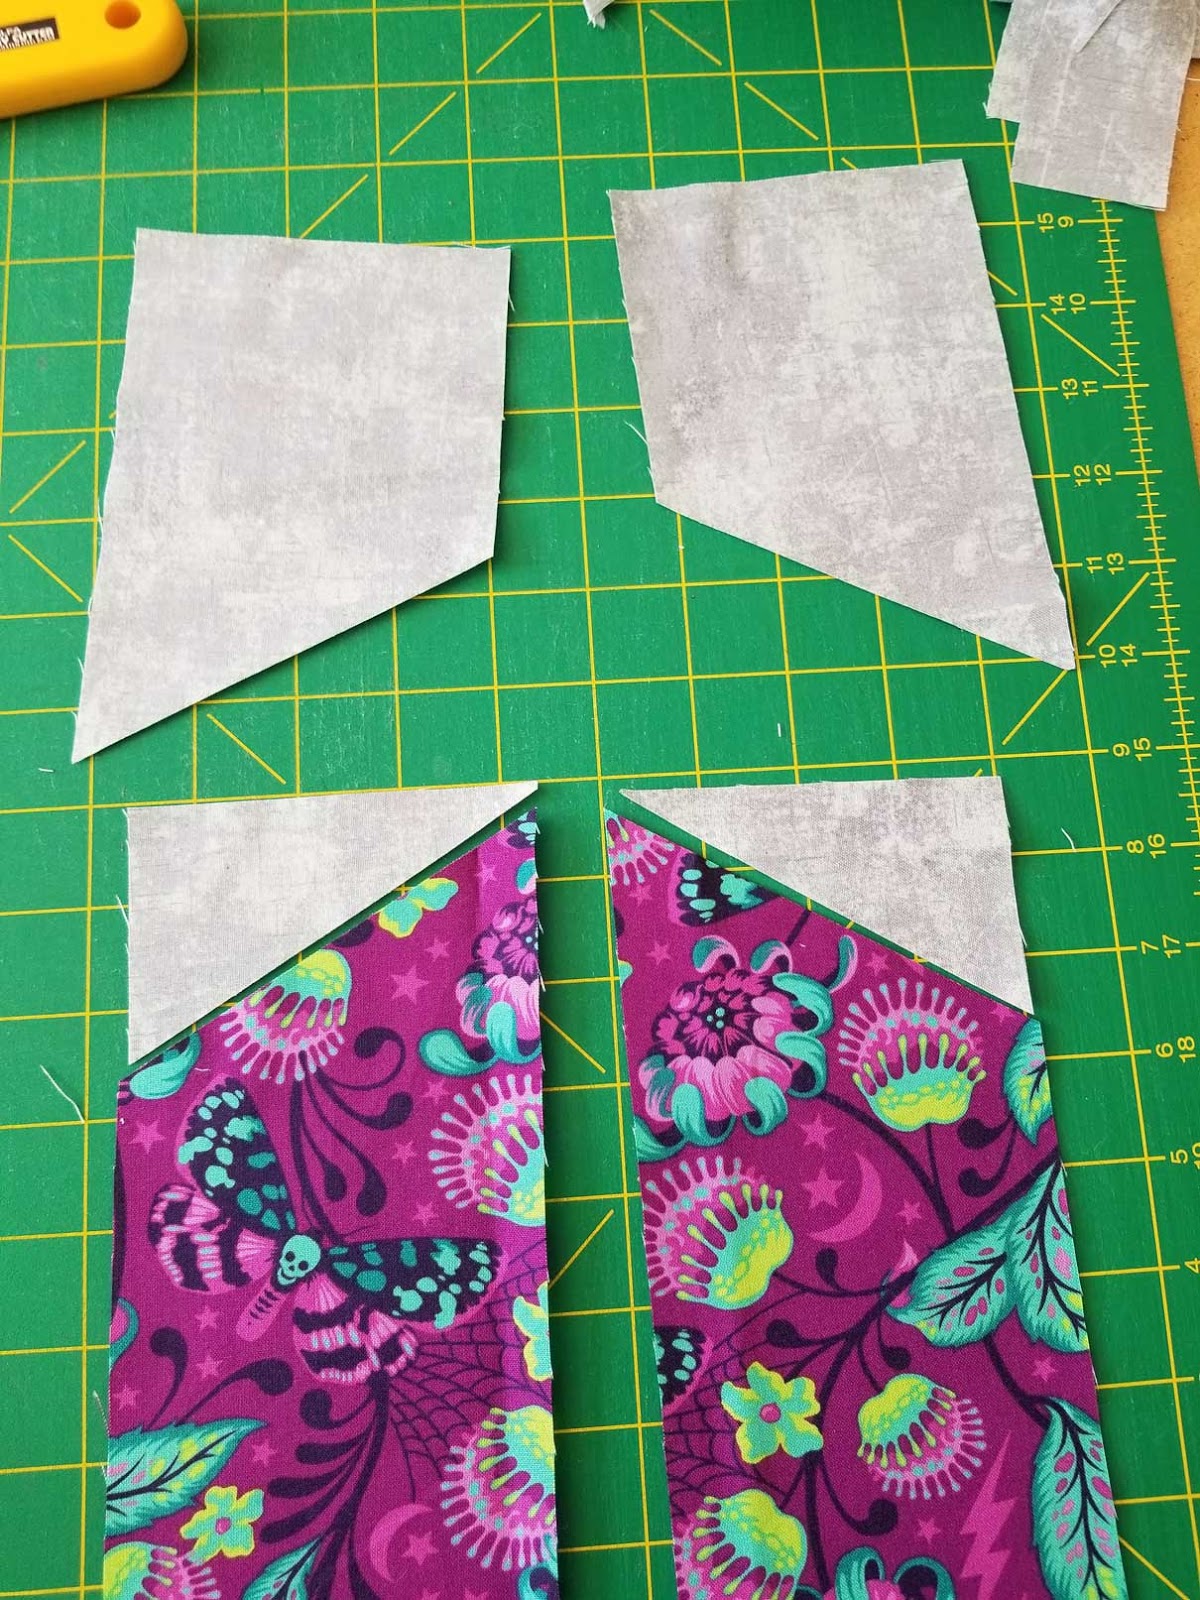
Lay the 4" by 6" rectangle of background on the rectangle of focus fabric. They are overlapped by about 2 ½". Make a cut from bottom left to top right on one and bottom right to top left on the other.
 |
| Overlap and cut the pieces |
 |
| The small triangle of focus fabric is excess |
Then rotate the background triangle so you can sew it to the focus print. The angles are the same, so it should work.
 |
| Rotate the small background triangle |
 |
| Switch the background bits to get the correct angle |
Using the leftover piece of background, cut the appropriate angle and discard the corner bit as shown below.
 |
| The cut-off bit that gets thrown away |
OK - that's lesson number one for today. Why was I in such a hurry to make those blocks? Well to get them done first off, but I wanted to take this picture. Yes - there's the concrete floor in Studio B. Wait! There's my little sewing stool. What's it doing in the middle of that big empty space?
 |
| My sewing stool in the empty studio |
 |
| A chip of my ceramic boots |
Nope - I wanted to get this picture so that's why I hustled with those blocks. The design wall is still up in Studio B. And I miss the darn thing. So I was down there bright and early yesterday morning arranging the blocks. OK - not arranging so much, but just threw them on the wall.
 |
| A seat with a view |
Here's a closeup of my blocks. I've got 88 made so far. I need 112. There are 16 more to make from the last four patterns. That leaves 8. I'll be going through the booklet and picking out 8 different blocks and making one more of each. I think I have just enough focus fabric to do that. I'm down to bits and I'm good with that. I don't want much for leftovers, however, I do have a plan for the leftovers. I did make extras of that diamond block as we were having so much trouble with it. Keep in mind, I could simply use 8 squares of the background fabric. They don't need to be pieced blocks!!!
 |
| 88 blocks from Lilla quilt |
So here's another lesson for the class, but you might as well all sit in as this is the best forum for me to pass along this information. The block placement is totally random. I'll be playing around with it before I start to sew it together. The blocks are 11 wide and 8 deep in the photo above. I'm going to make two quilts - both will be 7 by 8 so that has to be taken into consideration before I start to sew.
I picked one area and wanted to show you some things that I'm going to watch for as I place the blocks before they get sewn together. Anything that you don't like in the photo?? I put arrows so you can see what I don't like. Too many straight lines in the same area.
 |
| Too many straight lines |
I rotated the green block, which is better, but I still have that join with the pink and green. Hey - if it's not going to match (and it's not supposed to), don't emphasize that by putting the two seams together. That's just asking for trouble. I also don't like in the bottom of the photo that those two "diamond" shapes are going in the same direction. Same thing - those points don't match (and are not supposed to) so why pronounce that fact?
 |
| More points that don't match |
I rotated the green block one more time and I still have issues with those straight lines.
 |
| Too many lines "matching" |
 |
| Looks much better |
Watch that you don't have too many of the same block or the same color near each other. I used about 7 different focus fabrics so I have the luxury to move those blocks around. You may not if you chose fewer focus fabrics to work with.
 |
| Too much of the same color too close |
Look at the shapes. I don't like those two curved lines on top of each other so one of them will be moved.
 |
| Two curves on top of each other |
And here are the homework blocks for the summer. There are six of them and we're supposed to make 4 of each. Twenty-four blocks. Yeah - I'm done!!!!!
 |
| The six blocks for the summer homework |
Should anyone want to come and use that design wall, just let me know and I'll make arrangements.
The guys arrived around 11 to start the floor install. This was a picture I snapped partway through the day. They got quite a bit done and now we need to move the long arm this morning. I'm not looking forward to that.
 |
| The new floor is partially completed |
Now to find those videos to upload so you can see what we're up against today. Well - can you believe this??? I can't find those videos I took, so I took another one this morning. It's on YouTube. Let's just say that you NEVER want to be in the mess that I'm in. I'm not proud of it, but I have a plan. I just need way more days to sew!!!
Have a super day!!!!
Ciao!!!!
Wow, just watched the video. I do not envy you having to move it. Even if it is just half of it. The good news is when you move it back in it will be even more organized than it is....
ReplyDeleteThat's the plan!
Delete