That is the LAST time that I will say that I will do NOTHING cause I did pretty much did NOTHING all day!! My allergies/cold kicked in and it was so beautiful that I sat around - had a nap and read for most of the day! Oh dear!
I did get some quilting done, but did not get the quilt finished that I hoped to. Well that is now on the agenda for today.
However that does mean that I am able to catch up with some of the stuff from previous.
Here's an update on my redwork project (OK - I lied - I did a couple hours work on this yesterday while I finished the last two CDs of my audiobook!)
 |
| Three completed blocks (the top tree is wet in case you are wondering! - had to get rid of the blue pen) |
 |
| Here is the fourth block. Now here is the question - see those spikes off the border? Should I do ONE stitch or TWO??? I started with two - but that is very time consuming. So I switched to one - much faster! And it is a small wall hanging so shouldn't make a difference - but what is the right way????? Guess it depends on the length?? |
 |
| Same thing with the tree block - I started off with TWO stitches per spike on that garland - then switched to ONE and went way faster!!!! I HATE to do satin stitch in embroidery. The edges are NEVER neat. Yesterday I saw on the internet where someone had stitched a back stitch along the edge to neaten it up and I think it looks not bad!!!! |
 |
| The Mark-B-Gone pen. This is blue with a fine tip. I used to use the BIG blue one and it is too hard to work on fine detail. This one works great. Thanks Carol!!! |
 |
| Here is the one block with the crystals just sitting there. That is going to dress up this project a LOT!!!! Now here is where the wash out pen wouldn't work. Unless I waited until the end to get rid of the marks. And honestly - it really isn't necessary to mark the position of the crystals anyway!!! |
 |
| Close up of the crystals - don't they look BLINGY!!!!! |
Here is my second Halloween project. Yes - I should be stitching the table topper instead of working on the Christmas project!!!!
 |
| Halloween lap quilt |
 |
| Super Simple Squares by Possibilities |
 |
| This is the quilt from the book - I made mine quite a bit bigger! |
 |
| To make life easier when sewing together - half of the squares had seams pressed into the orange strip |
 |
| And half were pressed away from the orange strip |
 |
| Here is a block PRETRIMMED |
 |
| In order to have that orange strip match up nicely at the intersection, it is important to try and have it centered in the block. I put painter's tape on the ruler diagonally to use as a guide |
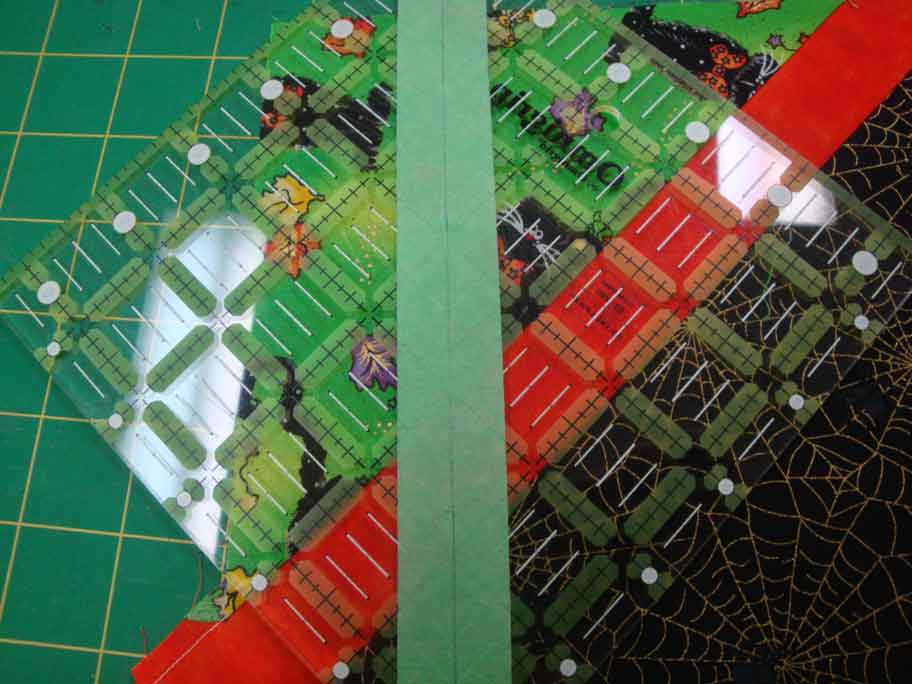 |
| Here is the painter's tape on the wrong side of the ruler! |
 |
| Trim off two sides with one ruler placement |
 |
| Turn the block around - line up the ruler (so nice to have a 6 1/2" ruler) |
 |
| Cut off the opposite two sides and there is a nicely trimmed block. I kept the blocks separated - seams into the orange strips and seams away from the orange strip |
Then when I went to put them on the wall - I pulled from alternating piles. That way the seams will be going in opposite directions to make easier sewing together. However I need to rearrange the blocks as some of the motifs are upside down and some colours need to be moved around.
I also got Christmas Heart Light on the design wall.
 |
| Christmas Heart Light - need to rearrange those blocks!!! |
 |
| Blocks are redistributed, but still not in the right place |
I will have to get the blocks in the right order soon because as soon as my machine is back on the weekend - I will need to get sewing!!!!!
And what is happiness??????? I think this picture tells all.......
 |
| The girls - happy to be together!!!!! |
 |
| Go away!!!!! - we are trying to SLEEP!!!!! |
OK - got a BUSY day planned for today. Let`s hope that allergy med kicks in soon - this leaking like a sieve nose is NOT what I need today.
Have a great day!!!!
Ciao!!!!!!
No comments:
Post a Comment