Today is the last day for the North Stars show and tell. Until September when we have our next class.
It's all about Willa the Walrus. These blocks are just cute!!! There's no way to get around it. They're adorable. Matter of fact, I have a couple of favorite designers and Elizabeth Hartman is one of them. I love pretty much anything that she puts out. But wait until the end of the blog - there's something very cute!!!
Here's a walrus block - got a couple of missing bits, but it's mostly completed. Love the mottled fabric used for the walrus body.
 |
| Great fabric for the body |
Here's Willa made up with Northcott Toscana. Prints on fabric are nice, but not necessary to get a great looking block.
 |
| The block is made with Toscana |
Love the colors in this one and look at that fabric used for the body! Yes - this walrus needs a wee operation on his head. He isn't supposed to have ears!
 |
| Great choice of blue for the outer bits |
The block with the tan background. They used directional fabric for the body, but HEY - you can't tell. Yep - it's time to get over the directional print thing. OK - there are times when it's important. But not in this block. The top and bottom need to be added. Looking great so far.
 |
| Tan background and directional fabrics |
Love the colorway for this block. I want to mention something about color. I chose some FQs from a different line of fabric (Not Elizabeth's) as the reference points for my blocks. They are somewhat similar to the fabrics in the original quilt. My goal was to find matching fabrics in my stash. There's just enough variance in the tints, tones, and shades that it's very hard to match up these colors. That's how they get us to keep buying fabric! Cause we have nothing in our stash to match. I did NOT buy anything other than those initial FQs for my version of the quilt.
 |
| Look at the stripe used in the flying geese |
Some of the fabrics in this block are from the kit and some are not. These blocks are a bit tricky to sew as there are a LOT of stitch and flip seams to deal with. Also lots of seams so if the seam allowance is a wee bit off, it can affect the size of the bits to sew together. Not for the faint-hearted, but I think the group is doing amazingly well with their homework.
 |
| Some fabrics from the original kit |
This block is all made with batiks. It's hard to tell from the photo, but most if not all the fabrics have some sort of dot theme going on. The entire quilt is like that!!! I LOVE the walrus fabric.
 |
| Willa goes dotty!!! |
I think this block is made from the fabrics in the kit. Kits are great and sometimes end up costing way less than if you went out to shop for all the fabrics. However, because you need so little of some of the fabrics, this was a great one to raid the stash.
 |
| Block made from the kit fabrics |
 |
| Seagull fabric into the block |
 |
| Great fabric for the walrus! |
Here's a closeup of little otters that are in the bottom row. Who designs this stuff???
 |
| Otter fabric |
These next two blocks are made from the kit fabrics. Notice how different lighting affects the colors of the blocks!
 |
| Block made from the kit |
 |
| Another block made from the kit |
I know that some of the group - well at least one, that is only making four blocks but I think most of the others are making the entire quilt. That's all the pictures I have of Willa. I hope everyone is up to date!!!
Now for pictures of the homework that I gave them for the summer. There are THREE blocks to do, but since we're not meeting until September, that's one block a month. They don't take that long!!! And guess what? I managed to get all three blocks completed for the class. Remember that I was missing a block that I had made??? Well, this is the missing block. I'm so glad I found it in time for the class.
This is Patty Polar Bear.
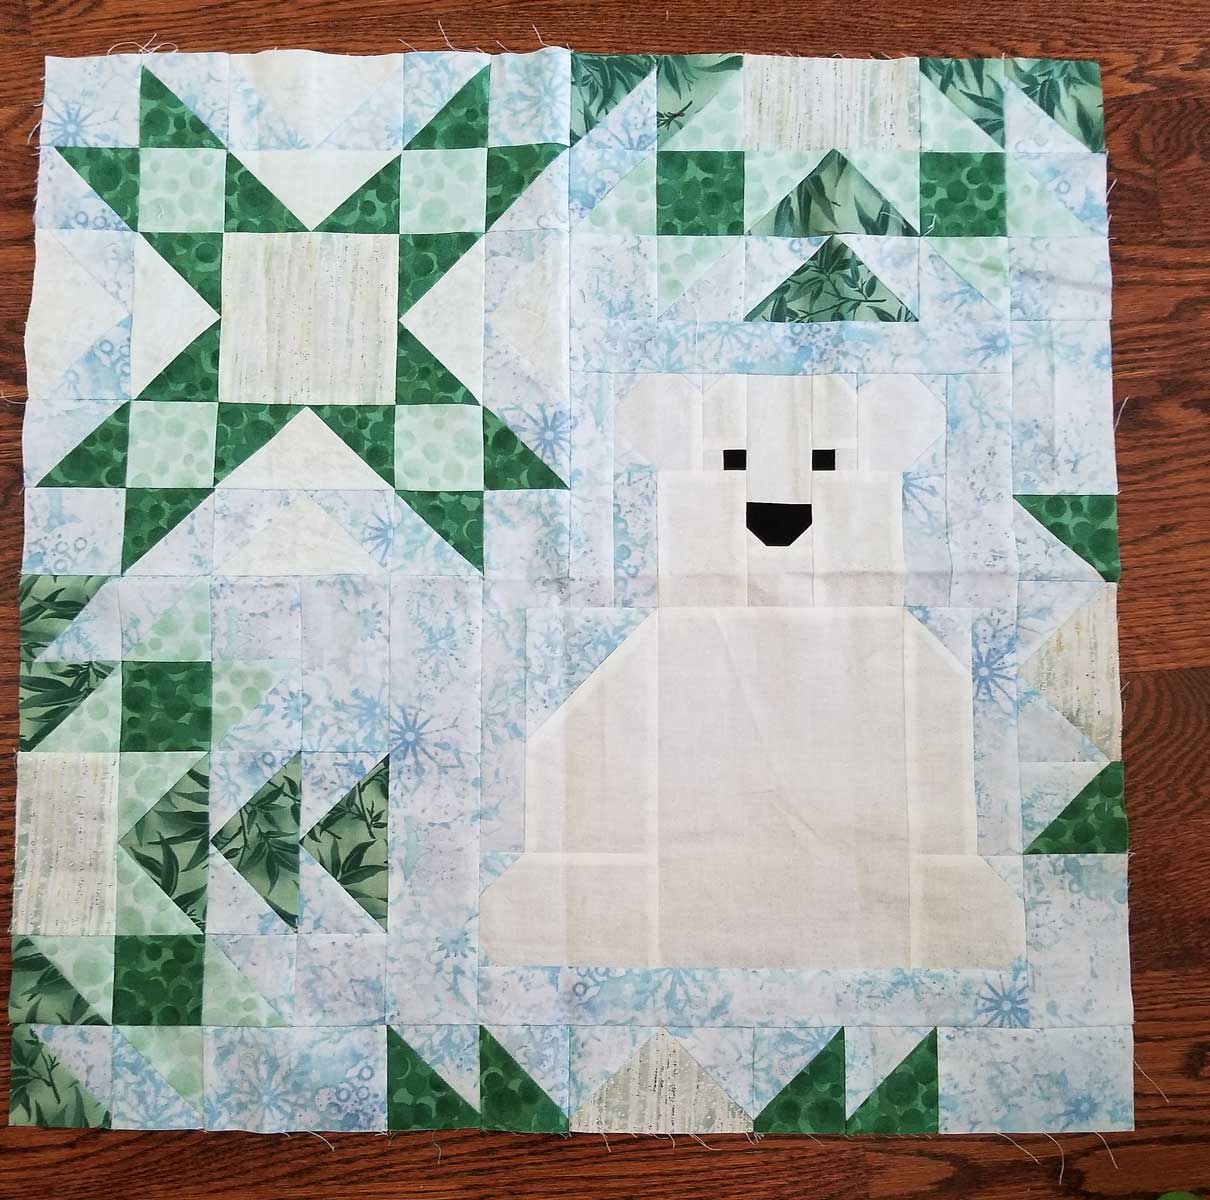 |
| Patty Polar Bear |
 |
| Olive and Oswald Otter |
 |
| Owen the Owl |
Ready for some total cuteness??? Now that I have access to my design wall again, I thought I'd put all my blocks (so far) on the wall. I'm in LOVE with this quilt and definitely worth all the work. Can't wait to get to work on the last two blocks!!! But a few other priorities before then.
 |
| North Stars quilt - so far! |
Cute, cute, cute!!!!! And only two blocks left! I feel super good about that. I don't have the space to keep all these UFOs so I need to finish them. And the amount of fabric that gets tied up in a UFO? Crazy. The nice thing about this quilt is that the fabrics are used for ONE block and with the exception of the background, you get different colors for the next one. The entire project (including the backing) fits nicely into a drawer in Studio U. I'll have to share that with you at a later date!!!
Speaking of organizing, I did a bit of work in Studio B yesterday. Not as much as I would have liked, but it's a start. I feel a little bit better and as some of you have mentioned, start with one box and go from there.
I know that this doesn't look like much, but this is stuff that I found that is going in the recycling. Boxes and fabric bolt boards that I saved??? For what??
 |
| Stuff for the recycling |
My goal for yesterday was to get the cutting table back in working condition. The two cupboards on either side were easy - they were basically sitting a few feet from where they were going. I had to unwrap them from the bubble wrap that they had been packed in. For the most part, the stuff in those cupboards is pretty much organized and it didn't get removed for the move. There are some stabilizers in one door that needs to be addressed.
 |
| The cutting table is back in commission |
Ah, but it wasn't without a wee complication. The two side cabinets were easy. The three rolling drawers - also easy. Although I did dust them off before they went back. The top? Well, I had to move a bunch of boxes and a couple of tables in order to get to the top. The table top went on - it just sits there somewhat secured by a couple of pieces of shelf liner. Now, where is that measuring tape that is glued to one side? Yep - that's on the side that is facing the wall. No problem, let's turn that tabletop around. Only to discover that it was also upside down!!! Of course, it was!!! But now it's in the right position cause we're going to use that today!!!
I've got a helper coming today and our goal is to measure the backings and label them. I put some of the backings on the table. There are two big plastic totes and another pile on a chair that also has to be measured. Hmmm - I wonder if she reads my blog and sees the mess - will she still come? Hey - I'm making grilled cheese sandwiches for lunch!!! Norma - - I want to see a picture of what you did with your backings!!! Check out what Norma is doing with her backings in yesterday's blog post.
While it looks like there is a lot of stuff (OK - there's a lot of stuff), a lot of those book boxes are only half full! Some of them have been crushed from the weight of each other. I unpacked a couple yesterday. I'm going to try and put all the books in one half of the bookcase wall and the other half will be for the magazines. DO NOT judge me. I know it's an issue.
I've got a plan. But I also like the comment from Elle as to how she whittled out her books. YES - I need to do that because I'm sure there are some books that I'll never use. Check out the comment on yesterday's blog post to see how Elle whittles her books. And if I EVER borrow another quilting book from the library - just shoot me!!! There is NO NEED to ever borrow another quilting book.
Thanks for the comments and suggestions. We are all in this mess together! We need to get our acts together and SOON. I really can't imagine leaving this mess to anyone. Not even another quilter. I created the problem and it's my issue to fix it!
We all have issues. Hoarders don't want to get rid of anything. I'm OK with getting rid of things, BUT for some reason, I want to read everything FIRST. God forbid if I just threw a box of paper away - NO - I have to check each and every piece. I have to read the entire magazine. I have to read all the words in a book. Why??? I've no idea, but I blame my mother for that! I've said this before on my blog, but when I was a kid, I had this dream (silly girl) of reading all the books in the world. I lived a VERY sheltered and isolated life until Grade 6 and had no idea of what went on in the real world!!
I will get over that - I have to. I'm better, but not great. But at least I recognize that and will try to move on. But isn't it interesting how our view of the world and how we relate to it get formed when we are little???
My goal in all this is to try and put all the "like" items together. Once I know what's there (and what doesn't fit), then I'll deal with the culling process. Unless it's something so obvious that I'll get rid of it immediately. The biggest thing is that I spent good money to buy all this stuff. If I don't get a little bit of enjoyment out of it before it goes, I'll be very disappointed. So I've got a plan!
The exciting news is that once that other bookcase goes up, there is room for Sit n Sew. That's all I care about. Well, not really - I wish I could find my quilting threads so I could get started on the long arm as well. I will find them!!! But I think I'm going to have to unpack all the books before I find them.
On that note, I'm off for a busy day of measuring and folding! Yeah! How exciting.
Have a super day!!!!
Ciao!!!
Here are a couple of really good videos on folding fabric that I watched when I was packing my room up. Lot's of talking but I skipped to the parts I needed. https://www.youtube.com/watch?v=TnHqmf--SZg https://www.youtube.com/watch?v=czKQZDIIQus
ReplyDeleteHappy folding!
Thanks Judi - I had seen her videos. I think it's a great idea, but just not going to work for me. I did share on my blog this morning!!
DeleteThis is how I have organized my backing fabric....http://silverthimble.ca/blog/2019/06/organizing-backing-fabric/
ReplyDeleteOf course this isn't ALL of my backing fabric...this is just the start. :)
Norma -- that is so organized!!! I LOVE what you did! Thanks for sharing.
ReplyDelete