Good morning!
While this blog post is specifically for my Reminisce class, there are loads of tips that you could hopefully use in your current project. So feel free to read through and if you`re really intriguted - maybe you can join our class at the Hobby Horse. Note they will be closed for two weeks so if you try to call - you might not get an answer.
 |
| Reminisce by Lori Smith - From my heart to your hands |
I figured it would be easier for some of you to see these close up pictures of my block to help you put yours together.
If you have any questions - leave a comment or send me an e-mail.
The biggest issue for me with this quilt was what fabric to use. ACK - so many choices. My first thought was to go with red and white. Simply because I'm intrigued with the red/white quilt thing. I dumped out one of my baskets of red and decided that it would be too limiting.
Then I thought about what lectures/classes I have coming up and perhaps I could make something that would suit one of my trunk shows. AHA - I'm getting smart - trying to kill two birds with one stone.
I do have a lecture on SCRAP QUILTS which is happening at Quilt Canda in June 2016. Hmmm - I don't think I have a scrap batik quilt. Got two boxes of batik scraps - sounds like a plan.
 |
| My two boxes of batik scraps |
I really feel that scrappy is going to be the best look for this quilt. Another option is to pick certain colors. Like this quilt - it is very scrappy and was made with reds, greens/ purples, blues and blacks. Medium to dark values. No rhyme or reason as to how the colors were placed except I tried to not put a red beside a red, but that was it! It is one of my favourite quilts and I get lots of comments on it.
 |
| Scrappy quilt - blues/reds/greens/purples and blacks |
Another alternative is to use up your UGLY fabrics. Come on - we all have some. Then you could say that you used those. As you have probably guessed by now - I love telling stories and to me - the more interesting the story about how the fabrics were found/located/bought - the more interesting that quilt becomes. Yes - I like going to the store to buy new stuff as well, but that's not nearly as exciting as hunting down that exact fabric or digging through scraps to make do. I guess it's all in how you look at it!!!!!
Since I'm using scraps, I wasn't always able to start with the squares as per the pattern. I found that using the Template Set A from Marti Michelle was the exact size needed to cut parts of this block. (Lucy - I'll send the equalivents to you!)
 |
| Cutting the scraps with Marti Michelle templates |
Now we have to make a lot of flying geese in this quilt so best to start off on the right foot. After you add the first colored triangle to the left or the right of the bigger light triangle (it does't matter which one you start with), press that seam AWAY from the bigger triangle. Away from the center! Then add the second colored triangle and also press away from the center.
Now this next step is CRITICAL and I do it for everything quilt I make. I TRIM as I go!!!!! So I'm going to trim this flying geese unit. We chatted yesterday about how to figure out the size. We know it is supposed to be 2" by 3 1/2". When trimming, let your ruler do the work for you!!!! If you're right handed, place that 1 inch and 1 inch markings on the top right hand side of the unit you are trimming. If left handed, place those markings on the left hand side.
Now there is a center of this unit and it should be where those two colored triangles meet. So if my flying geese is 3 1/2" wide, the center should be 1 3/4". You can see on my ruler that the DOT marking the 1 3/4" mark is placed right where that intersection is. I also have the bottom of the ruler (well the 2" marking) along the bottom of my flying geese unit. See the dog ears - we don't want them.
Now you trim up the right hand side of the ruler and carefully across the top.
 |
| Trim right and top |
 |
| Rotate unit and trim again |
 |
| This is what I trimmed away. |
OK - now we have to add the flying geese units to the center square in a square unit. But how to get those points to mach up?
First step - place the two pieces right sides together. Then take a sharp pin and poke it through the wrong side of the top piece (the brown/cream below) and then poke the pin through the EXACT same spot on the piece underneath (green/gold). |I pulled that brown triangle (middle bottom) out of the way so you can see the pin in the underneath part.
 |
| Matching up the points - flying geese to square in a square |
You may have to manipulate the pieces but you want that pin to be standing straight up, with the beginning and end edges lined up. Sometimes the seam allowance at the point will stick over (on one of the pieces) and this is normal as the point may not be exactly the same distance from the edge on both pieces. Rarely happens that those seams line up exactly.
When that pin is standing straight up, stick two more pins into the work to hold that point secure and remove the standing up pin.
 |
| Secure with two pins |
Now you're going to sew that seam. Notice the two pins in the fabric - I leave them in and YES - I sew over them. Carefully. If you prefer to remove them - do so just before you get to the pin. DO NOT readjust those seam allowances to match. That defeats the purpose of the pinning process.
Notice also in the photo below, that I'm using a quilter's awl or stiletto to control the fabric (metal pointy thing in the bottom middle). As those thick points go under the foot of your sewing machine, they will have a tendency to shift to the left. Keep them in place by using the quilter's awl. It will feel very cumbersome at first, but once you get used to it - your accuracy will be way improved.
 |
| Sewing the seam with the points - use a quilter's awl |
In the next two photos, you can see where that vertical seam line hits the point which is formed by the intersection of those two diagonal seams. In the first sample, the vertical seam is just a smidgen too far to the left and when you open up the sample, the point will be slightly gone on the gold. I'm talking teeny tiny!!!
 |
| Seam is about one thread wide too far to the left of the intersection |
 |
| This one is just a smidgen to the right of the intersection - perfect |
Let's just say that I'm happy with the results below. (I did modify the seam on the upper sample so the point wouldn't get lost).
 |
| Perfect points! |
 |
| Perfectly FLAT |
And there is the very center of our quilt.
 |
| Center block |
 |
| Seams pressed flat. |
 |
| Pretty darn close to 6 1/2". Close ENOUGH!!!!! |
 |
| Pressing the half square triangle |
 |
| Yes - I twirled the seam on this one - it makes the center lie flatter |
Now let's have a look at those bigger flying geese units in the second round of this quilt.
You can see below that I have started with the small flying geese unit. I added a triangle to either side of it and then lastly, I added the triangle on top. You can see that the diagonal edges are pretty straight. What you don't want is a big jog where the top triangle meets the bottom part. It would be next to impossible to sew the next piece on.
 |
| Straight edges along the diagonals |
 |
| Trim off dog ears and check for the 90 degrees |
Sew on those two bigger colored triangles to get the bigger flying geese unit. Notice that my seam along the top isn't perfectly lined up, but I measured with the rule and will trim a bit of the one on the right away - phew - I don't have to rip. Remember - it doesn't have to be perfect, but you don't want to cause problems when you go to sew the next seam.
 |
| Flying geese unit is together |
 |
| Nice flat seams - always press away from the center |
My nine pieces are assembled and waiting for the final step.
 |
| Components are assembled and waiting final seaming |
 |
| Pressing scheme for the block |
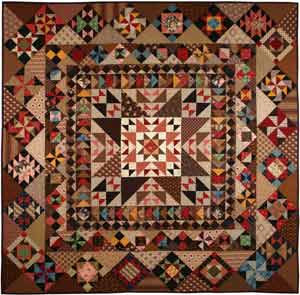
 |
| VOILA - quilt center is DONE |
I'm pretty happy with that. I notice that I mostly used browns/creams and greens. Nothing bright, nothing blue. Hmmm - going to have to sneak something in - I've got a lot of that in the scrap box!!!! I guess we'll just have to wait until next time to see what comes out of the box!!!!! OK - I did cheat - the ligher colors, I pulled from my batik stash box.
Have fun with the block - remember it is better to be done, than perfect. Oh yes - notice how the edges of the block are SMOOTH. No jagged edges. As I mentioned before, that is CRITICAL to getting this quilt to work. And yes - it measures 12 1/2". TRIM each component as you work. Don't wait until the end. It never works.
Have a great day - if you have questions - PLEASE PLEASE e-mail me or leave a comment so I can help out.
Ciao!!!!!!!!!!!!!
No comments:
Post a Comment